Posts

Showing posts from March, 2019

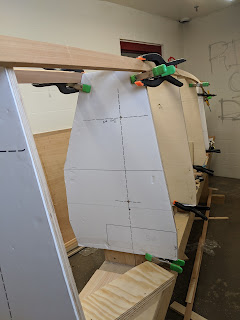
You can never have too many clamps

Image
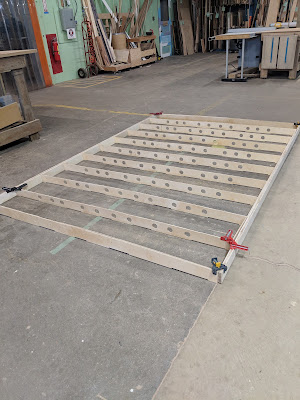
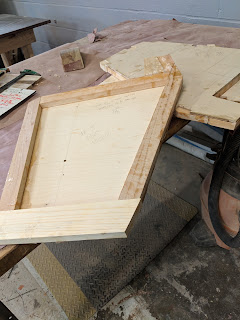
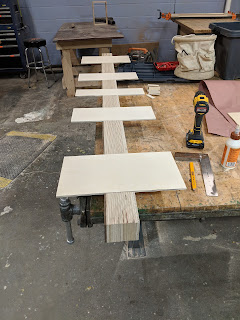
Yes, really big picture of not much, but sometimes the day just happens.  I was working solo today, so no pics of the tasks other than this one. Leveled and re-baselined all frames. We had been temporarily using one screw and then clamping the frame to the base in order to make adjustment easier.  This did lead to some moments, but nothing critical. Did you know that a good smart phone has a dead on level that fits in tighter spots than my bubble level.  The entire strongback and frames trued up to 89.9 degrees, +/- .05.  A grain of sawdust will move the needle more than that! The work at the right is the two deck beams with an 11" spacer glued in between the cross-beam slots.  This should make for a nice, tight alignment.  After we take the clamps off tomorrow, these could still get a little weight taken out - they are 'robust'. I'll try to post updates this week as progress is made.  There are a thousand little jobs that can be done in parallel with 'watch

The deck

Image
Building out the deck for this boat is about as straightforward as it gets in terms of the big bones.  It'll take some time after the first big step to get everything positioned and ready to cover up. Some details.  First, I'm cheating on the deck - it's 6mm Baltic Birch underlayment.  I know - red flags going up all over the place.  But - I've talked to several local builders, and they've built their entire boats from the stuff.  Waterproof glue, no voids, 5 layer, and it will all be flow coated with epoxy before it gets sealed up in any case.  I'm still using marine Okuome plywood for the hull, but at a 4:1 difference in price, I'll experiement with the deck. Construction: The side rails are 3 layers of 6mm laminated with epoxy (and a little cabosil).  It adds a little weight, but it won't warp or twist, and it's idiot strong. Cross-beams - 6mm ply, with 1.5x3.5" boards laminated between 1-2 and 12-13.  Spacing worked out to be 11"

Fairly fair

Image
Brian beveling notches with a Dozuki We've been making progress this week.  Fairing lines, subtle little bevels and tweaks to make everything 'look' right.  And yes, we've certainly found a couple of things that we could've done differently.  but - the nicest thing about working with wood is that it's mostly all correctable.  If you just don't like a bulkhead, do it over! Tonight, the mission was to finish cutting notches for stringers, get the strongback braces dialed in to fit the deck stringer placement, and final fairing for the chines.  And we managed to do all of the above! Chine and stringers in place.  Frames mostly ready to go.

Next steps

The focus for this week is moving forward.  There are about 500 things that have to be done before committing the skeleton to glue.  We had a couple of minor setbacks, and have recovered from those.  We've stayed with the extra heavy frames, and have cut out the centers of these to remove some of the surplus weight.  All in all, it probably cost us 10lb additional.  Tear everything down - again Double check all dimensions for accuracy and consistency.  For example, our deck is a clear deviation from the plans - Richard designed a boat that can be used in big, open water.  Our build is designed for smooth, protected water, with just a bit of deck furniture instead of a cabin, no storage lockers, etc. As a result, our attachment from deck to hull is similar to, but different than the design.   Trim all stringer notches for all frames Fit stern - the design is intentionally vague to allow for customization. Fit bow - it's an interesting amalgamation of bones and connecting

Two steps forward, one step...

Image
Not quite the big build day I had in mind yesterday.  We had several targets this weekend - finish building out framing for all bulkheads, finish up fairing stringers, and *maybe* start a little assembly. It almost always takes more time than you think it should, and working tired is almost always a really dumb idea.  As a result of the latter, I lost a couple of hours work cutting framing material, only to realize that the frame still needed tumblehome added and that would change the frame build.  Worse though was a lack of communication between me and the rest of the build team regarding which frames needed to be 'flat topped' to match the deck and allow bolting the deck to those frames.  Yep, cut too far.  We were able to salvage everything, added some additional reinforcement, and will now take the belly out of the bulkhead.  I haven't decided whether to route out the middle, or use a Forstner bit to create 'swiss cheese'.  Leaning toward Swiss cheese. It was

Week Four

Image
Stringing it together I think in the past week, we've had the bulkheads on and off the strongback three times, and a couple yet to go.  The first was to double check alignment for all the base blocks and to correct a small hog in the strongback itself.   While the frames were off, we cut the chine stringer notches, and marked where the rest.  Then back on the strongback to clamp the bottom chine stringers, and make sure the rest would lie fair before letting them into the bulkheads. Favorite tool Once we were satisfied with the stringer placement, it was time to take it all down again, cut out the notches, set it all back up and check it - again. The other big decision to be made at this point was "where does the deck go..."  The original Skoota design is a blue water cruiser, designed to be out in waves, to have a cabin, and has very different above water design goals than a boat that has no cabin and will likely never see water with more tha

Week Three

Image
 And now for something a little different  I've been on the road for the past two weekends, and haven't done a huge amount of work on the boat.  There's been progress by the rest of the build team, and we'll catch up on that later in the post. I wanted to share a stop I made last weekend at the Washington Canoe Club, located on Water Street in Georgetown.  Olympic glory - Frank Havens, 1952 Gold medal, 10,000 meters If you want the full story please visit the WCC website , but the two boats on display are American Olympic History.  The lower boat is a "Peanut", a standard racing design paddle by one or two paddlers.  Frank won the Silver medal in the 1948 London Olympic Games in this boat. The boat is white oak on thin ribs, clenched nails.  Organizational chaos isn't a new concept For 1952, Frank purchased a new "plywood" boat from Sweden, and as friends tell, the family at a lot of beans, rice and chicken that summer to p

Week Two

Image
Trying to catch up on what we've done/been doing/will do.  There are a couple of weeks left to get current, and I'll try to catch up about a week at a time. Lofting, scarfing, and fabricating Among the many decisions to make was building material. We're doing the hull out of 4mm Okoume, with stringers of cedar.  Flow coat the whole thing with epoxy and wrap it in glass.  Since the boat will be stored indoors between sessions, We're not too worried about sunburn, but we'll paint the whole thing just to make it look 'right'.  The deck assembly will be much the same, but cored with 6mm birch underlayment, also flow coated, and with epoxy sockets for fitting bolts.  I'll try to take some snaps of that as we go along.  One of the touchiest items when making anything with thin plywood is doing 10:1 scarf joints out of 4mm ply.  I built a scarfing board out of MDF, set up for a Bosch router with 10mm fence guides.  I can't find the video right now.  I

Week One

Image
First you take a drawing... My buddy Brian, who is a DBA extraordinaire in real life, is also an amateur boat builder and has been 'learning CAD/CAM/CNC'.  He offered to take the files for the Skoota and scale them down to our desired 53%.  Yes, I know... What a pain in the butt... Anyway, Brian not only scaled the drawings, but also printed them out on his flatbed CNC machine.  He didn't have the router working yet (darn) but even printing the bulkhead templates was a big help. Brian being very meticulous We put two sheets of 6mm plywood together, attached the templates, and cut them out - mostly freehand Skilsaw.  The design is pretty asymmetrical, and we've been very careful to keep the bulkheads together so that anything we do for the starboard hull, we also set up for port.  We were careful as well to ensure that our 'anchor screws were precisely aligned at the waterline and a lower reference line.  This line was our scribe line to be used later to ali

Welcome

Image
Note:  This build began with assistance from Richard Woods (https://sailingcatamarans.com ), who allowed us to acquire the plans and adapt his Skoota design to fit our build requirements.  We are feeding back our build to Richard for possible inclusion in a more formal offering of the Skoota "16".  Any inquiries about plans, costs, etc. should be directed to him, with our gratitude. Another note - most of this build is being done in metric.  However, since most of my audience is used to inches, feet and pounds, we'll express dimensions in those terms.  My apologies to those used to the better system.  Magic numbers 25.4, .0394, .454, 2.2, 1.61, .62.  Oh, and 42. The project You may have linked here from TCPaddlesports.com or our Facebook page.  Or maybe from some other post.  In any case, this will be the story (hopefully not too long) of building a new low wash launch for our canoe/kayak racing club. RIP "Murphy" our aging coach launch When we formed