Week Two
Trying to catch up on what we've done/been doing/will do. There are a couple of weeks left to get current, and I'll try to catch up about a week at a time.
Among the many decisions to make was building material. We're doing the hull out of 4mm Okoume, with stringers of cedar. Flow coat the whole thing with epoxy and wrap it in glass. Since the boat will be stored indoors between sessions, We're not too worried about sunburn, but we'll paint the whole thing just to make it look 'right'. The deck assembly will be much the same, but cored with 6mm birch underlayment, also flow coated, and with epoxy sockets for fitting bolts. I'll try to take some snaps of that as we go along.
One of the touchiest items when making anything with thin plywood is doing 10:1 scarf joints out of 4mm ply. I built a scarfing board out of MDF, set up for a Bosch router with 10mm fence guides. I can't find the video right now. If I find it later, I'll update this page, and post a picture of the rig all set up. We're not cutting/scarfing panels for another week or so.
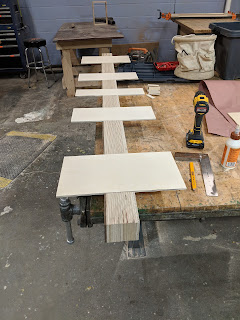
We have spent a couple of days cutting ribs and caps for the deck, and turning 1/4" ply into 3/4" beams. These will form the side rails for the deck, and will be stronger and straighter than dimensional lumber. The extra strength isn't really necessary, but straight and stiff is important.
Next was laying out and cutting the ribs. Here again, these are probably over designed. The previous deck is a little over an inch thick with a balsa core. This will be 4"x7' wide, x 10' long, with doubled ribs fore and aft, and a rib about every foot. There will also be longitudinal doublers across spaced across the deck to reinforce the high traffic/use spots - where the deck furniture mounts, walking path, and battery station slides. The deck beams were screwed together, inserts for the deck panels dado'ed in, and lightening holes bored just to remove a bit of weight. The latter will aslo allow easy plumbing for the control cable to get from the console to the motor.
There was also a lot of down-time during weeks 2 and 3. I had business trips on both weekends, and there were other commitments as well. While waiting on the hull layout guys (Brian and Dan) to be able to finalize getting forms mounted and aligned (that's probably in reverse order), I started to work on all the things I didn't like about the old boat. Number one was that I prefer to stand or perch at the wheel when coaching. With the old boat, it was sit only. Put all your weight on your feet, and the boat wanted to dive!
I spent an evening walking from bench to bench and pretending to drive. I'm sure people thought I was a little 'off', but it did let me decide on the height and width needed to mount the controls.
Next up: The hull.
Lofting, scarfing, and fabricating
Among the many decisions to make was building material. We're doing the hull out of 4mm Okoume, with stringers of cedar. Flow coat the whole thing with epoxy and wrap it in glass. Since the boat will be stored indoors between sessions, We're not too worried about sunburn, but we'll paint the whole thing just to make it look 'right'. The deck assembly will be much the same, but cored with 6mm birch underlayment, also flow coated, and with epoxy sockets for fitting bolts. I'll try to take some snaps of that as we go along.
One of the touchiest items when making anything with thin plywood is doing 10:1 scarf joints out of 4mm ply. I built a scarfing board out of MDF, set up for a Bosch router with 10mm fence guides. I can't find the video right now. If I find it later, I'll update this page, and post a picture of the rig all set up. We're not cutting/scarfing panels for another week or so.
We have spent a couple of days cutting ribs and caps for the deck, and turning 1/4" ply into 3/4" beams. These will form the side rails for the deck, and will be stronger and straighter than dimensional lumber. The extra strength isn't really necessary, but straight and stiff is important.
 |
| Deck beams stacked, with test panels fit. |
 |
| A drill press, a Forstner bit, and we have deck beams |
 |
| Mini prototype console. |
I spent an evening walking from bench to bench and pretending to drive. I'm sure people thought I was a little 'off', but it did let me decide on the height and width needed to mount the controls.
Next up: The hull.


Comments
Post a Comment