Glass!!!
And we have glass on the starboard hull!
Sorry for the delay in posting. I was out of town on business most of the last week. Work you get paid for has a way of getting in the way of work you do for enjoyment!
 It's been a busy week or so though. Since the last post, we closed off the last two planks on the hull. We didn't get great pictures of the last steps to closing. suffice to say you can't use clamps on a plank that doesn't have exposed frames. And to properly secure a plank with as much twist as the bow would require a *lot* of clamps!
So we used staples. At first, we tried using rosin paper to provide a removal gap. No dice. Mahogany is too soft to stand up to mechanical extraction. After that, we used scraps of 3-4mm planking which could be gouged to provide clearance for pliers. I'll try to get photos when we do the other hull.
My buddy Jonathan offered to help me do the glass work. He'd not worked with resin/glass before, and saw it as an opportunity to learn a new skill. Being totally mercenary, I saw it as a great chance to have free labor:)
Once all the planks were down and trimmed, Brian gave everything a good once-over, bringing everything to lines, and a once over light sanding.
Last night, Jonathan and I spent about 5 hours cutting glass, applying a flow coat, and then glassing in. Suffice to say it was a long, busy evening!
We used Adtech Pro-build epoxy and medium cure resin. The medium cure allows at least 30 (and more like 45-60 minutes) at room temp, which makes it fairly easy to work continuously.
After flow coating, we first added an extra layer of glass over the front half of the hull, saturated that with resin and flowed that out smooth.
Next, we added a layer of glass to the stern, got it smoothed into place, and then moved to the main even.
Draping the entire hull with the measured glass, we spent quite a while smoothing, tugging, and rearranging it to minimize spots where it didn't drape cleanly. Any folds or wrinkles at this point would be mirrored (or worse) into the final job.
And now for the big pour. We mixed about 8oz/250ml of resin at a time, and worked both sides from the middle of the hull. The pattern was to start on the bottom, work down toward the waterline, and then alternate sections fore and aft until the whole hull was done. Since I had the easier (inner) side, I also mixed more resin as we ran out. All told, we probably used around 36-40oz/1.25l of resin. I'm sure we weren't as efficient as we could've been, but a little wastage was not a concern.
As we expected, the bow is the hard spot. We spent a lot of effort cutting darts in the glass, and applying a little extra resin to ensure that if we did get a bubble, it would have resin overloaded. This will almost certainly require some additional sanding after the fact, but we really tried to avoid any voids.
 Next came the really tough part - chasing bubbles along the seams. We found that the best approach was to slowly and carefully apply a little pressure with the flat of your hand to the glass, gently moving it toward the outer edge of the fabric. By slowly pulling on the glass, we could move any bubbles down, and then chase them off the edge of the hull.
This afternoon, I'll go back and add another coat of resin, let that dry, and add the final coat on Monday night.
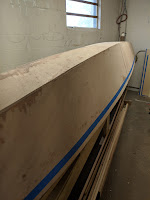
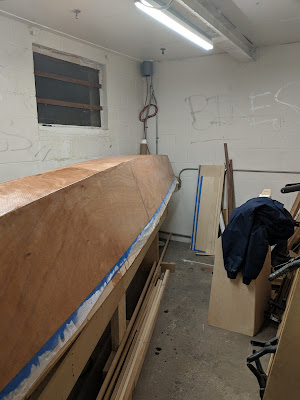
One other note. You may have spotted the blue tape line along the hull side. Since we had excess planking on the sides, we plan to trim that to line after we flip the hull into cradles (sometime this week).
Sorry for the delay in posting. I was out of town on business most of the last week. Work you get paid for has a way of getting in the way of work you do for enjoyment!
 It's been a busy week or so though. Since the last post, we closed off the last two planks on the hull. We didn't get great pictures of the last steps to closing. suffice to say you can't use clamps on a plank that doesn't have exposed frames. And to properly secure a plank with as much twist as the bow would require a *lot* of clamps!
 So we used staples. At first, we tried using rosin paper to provide a removal gap. No dice. Mahogany is too soft to stand up to mechanical extraction. After that, we used scraps of 3-4mm planking which could be gouged to provide clearance for pliers. I'll try to get photos when we do the other hull.
My buddy Jonathan offered to help me do the glass work. He'd not worked with resin/glass before, and saw it as an opportunity to learn a new skill. Being totally mercenary, I saw it as a great chance to have free labor:)
Once all the planks were down and trimmed, Brian gave everything a good once-over, bringing everything to lines, and a once over light sanding.
 |
| Flowing it out |
Last night, Jonathan and I spent about 5 hours cutting glass, applying a flow coat, and then glassing in. Suffice to say it was a long, busy evening!
We used Adtech Pro-build epoxy and medium cure resin. The medium cure allows at least 30 (and more like 45-60 minutes) at room temp, which makes it fairly easy to work continuously.
After flow coating, we first added an extra layer of glass over the front half of the hull, saturated that with resin and flowed that out smooth.
Next, we added a layer of glass to the stern, got it smoothed into place, and then moved to the main even.
Draping the entire hull with the measured glass, we spent quite a while smoothing, tugging, and rearranging it to minimize spots where it didn't drape cleanly. Any folds or wrinkles at this point would be mirrored (or worse) into the final job.
 |
| Getting the stuff to stay where it belongs |
And now for the big pour. We mixed about 8oz/250ml of resin at a time, and worked both sides from the middle of the hull. The pattern was to start on the bottom, work down toward the waterline, and then alternate sections fore and aft until the whole hull was done. Since I had the easier (inner) side, I also mixed more resin as we ran out. All told, we probably used around 36-40oz/1.25l of resin. I'm sure we weren't as efficient as we could've been, but a little wastage was not a concern.
As we expected, the bow is the hard spot. We spent a lot of effort cutting darts in the glass, and applying a little extra resin to ensure that if we did get a bubble, it would have resin overloaded. This will almost certainly require some additional sanding after the fact, but we really tried to avoid any voids.
 Next came the really tough part - chasing bubbles along the seams. We found that the best approach was to slowly and carefully apply a little pressure with the flat of your hand to the glass, gently moving it toward the outer edge of the fabric. By slowly pulling on the glass, we could move any bubbles down, and then chase them off the edge of the hull.
 This afternoon, I'll go back and add another coat of resin, let that dry, and add the final coat on Monday night.
One other note. You may have spotted the blue tape line along the hull side. Since we had excess planking on the sides, we plan to trim that to line after we flip the hull into cradles (sometime this week).
 |
| All done for the evening. Time to go home |
 |
| Jonathan - still smiling after 5 hours of resin work |

Comments
Post a Comment